Introduction
My WordPress website, as much as I love it, started to have problems. All images on the website disappeared and some pages would result in an error from Cloudflare. I tried rolling back to a previous version as I thought I ran out of storage, but that provided no results. I also tried disabling plugins as I thought my caching plugin might’ve been the culprit, but again, nothing. I decided it was best for me to move to a different website.
Replacements
I had many options to choose from including Wix, Squarespace, and another WordPress website. This however, would’ve been quite costly as decent hosting was not cheap. I looked into other possibilities and remembered that I heard of static websites. Static websites are much more secure and load faster compared to WordPress. I had initially worked with WordPress because I heard it runs most websites on the internet. In my case, I didn’t need to run a WordPress website and a static one would do just fine.
The first static website generator I found was Eleventy. I remember seeing it somewhere in the past, but I didn’t want to learn JavaScript, so I had to move on. My next option came from Jamstack’s list of site generators listed by GitHub stars. On the top of that list was Next.js, I tried going through the tutorial, but I didn’t really have the time to learn all the intricacies of how to use it. So, I moved to the runner up on the list, Hugo. Hugo had ready to go templates that I could deploy quickly. With the vast amount of template options, I decided to go with Hugo for my static website generator.
Hugo
Before I could install Hugo, I needed to install Homebrew. The process was quite simple as I just needed to run one command in my terminal.
/bin/bash -c "$(curl -fsSL https://raw.githubusercontent.com/Homebrew/install/HEAD/install.sh)"
After, Homebrew finished installing, I was ready to start the installation of Hugo. I followed the steps of the quick start guide from Hugo’s website
brew install hugo
hugo new site quickstart
cd quickstart
git init
I then, downloaded the MeiK2333’s GitHub Style theme and renamed it to github-style. It was then moved to the themes/ directory.
echo theme = \"github-style\" >> config.toml
hugo server -D
After those steps, I was able to access the live website at http://localhost:1313/.
Netlify
After I verified everything was running correctly and created a few posts, it was time to move my website to Netlify. I created a private repository with GitHub desktop and pushed it to my GitHub account.
I then followed Hugo’s guide on hosting with Netlify. I had to create a file in the root of my repository called netlify.toml with the following contents:
[context.production.environment]
  HUGO_VERSION = "0.83.1"
I then deployed the site and then configured a custom domain with external DNS.
That was it for hosting with Netlify, any time I wanted to change my website, I would make modifications locally and then push it to my repository. Netlify would then automatically update my website.
Cloudflare
I also tried using Cloudflare Pages to host a static website. As with Netlify, I pushed my code to a repository and connected it to Cloudflare. This time, I didn’t need to create a netlify.toml file, but I needed to create an environment variable with my Hugo version (0.88.1). I had trouble deploying my website without that variable.
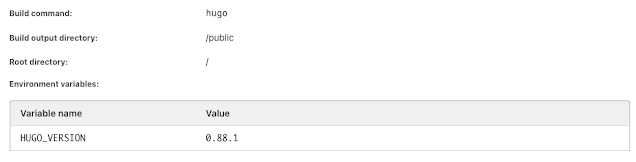
The website deployed in 1 minute and 20 seconds. I have yet to add a custom domain my Cloudflare website.
Conclusion
The failure of my WordPress website might’ve been a blessing in disguise. I find with Hugo and Netlify, that editing my website is much easier. With the website being hosted on Netlify’s servers, I no longer need to open my firewall and configure a reverse proxy for my websites. There is also the benefit of increased availability (since it’s not on my servers) and ease of use. The quicker loading speed and security is the cherry on top. Overall, I’m very happy with how the website turned out and I may look into other static website generators and hosts.